ラベル 作業記録 の投稿を表示しています。 すべての投稿を表示

2017/03/17

Windows 環境で Gradle 3.4.1 を使う

ギョームで Java を使うことになったので、 Gradle の復習をしていく。

環境構築

Chocolatey なんて使わせてもらえないから手動構築を行う。 手順は Gradle | Installation 参照。

バイナリの入手

Binary-Only のリンクからファイルをダウンロード。 (2017/3/16 時点では、gradle-3.4.1-bin.zip がダウンロードされる)

展開してパスを通す

  1. %USERPROFILE%\develop\ ディレクトリを作成
  2. 「1.」で作成したディレクトリで gradle-3.4.1-bin.zip を展開し、できたディレクトリを gradle-3.4.1 にリネーム
    • %USERPROFILE%\develop\gradle-3.4.1 というディレクトリができる
  3. %USERPROFILE%\develop\gradle-3.4.1\bin にパスを通す
  4. 環境変数 JAVA_HOME を設定する

動作確認

> cd %USERPROFILE%\project\
> mkdir GradleTest
> cd GradleTest
> gradle init --type java-application

これでプロジェクトのひな型ができたので、早速ビルドする。

> gradlew.bat build

本来は gradlew.bat を使う必要はない(すでに環境構築してあるホストだから)けど、配布された側になったつもりで gradlew.bat を使う。

gradle や、依存ライブラリをダウンロードしたうえでビルドしてくれる。

>gradlew.bat run
:compileJava UP-TO-DATE
:processResources NO-SOURCE
:classes UP-TO-DATE
:run
Hello world.

大丈夫そう。

設定ファイル作成

  • eclipse で実装
  • JUnit でテスト
  • findbugs 使う(html レポート)
  • jacoco 使う(html レポート)
  • checkstyle 使う(html レポート)
  • build するだけで findbugs, jacoco, checkstyle のレポートを出力する
  • lombok 使う
  • args4j 使う

あたりの設定を追加。

/*
 * This build file was generated by the Gradle 'init' task.
 *
 * This generated file contains a sample Java project to get you started.
 * For more details take a look at the Java Quickstart chapter in the Gradle
 * user guide available at https://docs.gradle.org/3.4.1/userguide/tutorial_java_projects.html
 */

// Apply the java plugin to add support for Java
apply plugin: 'java'

// Apply the application plugin to add support for building an application
apply plugin: 'application'

apply {
    plugin 'eclipse'
    plugin 'checkstyle'
    plugin 'findbugs'
    plugin 'jacoco'
}

sourceCompatibility = 1.8
targetCompatibility = 1.8
version = 1.0

[compileJava, compileTestJava]*.options*.encoding = "UTF-8"

// In this section you declare where to find the dependencies of your project
repositories {
    // Use jcenter for resolving your dependencies.
    // You can declare any Maven/Ivy/file repository here.
    jcenter()
}

[checkstyleMain, checkstyleTest, findbugsMain, findbugsTest]*.ignoreFailures = true

configurations {
    provided
}

sourceSets {
    main {
        compileClasspath += configurations.provided
    }
}

eclipse.classpath {
    plusConfigurations += [ configurations.provided ]
    minusConfigurations += [ configurations.provided ]
}

dependencies {
    // This dependency is found on compile classpath of this component and consumers.
    compile 'com.google.guava:guava:20.0'

    // Use JUnit test framework
    testCompile 'junit:junit:4.12'
    testCompile "org.hamcrest:hamcrest-all:1.3"

    compile 'args4j:args4j:2.0.16'
    provided 'org.projectlombok:lombok:1.16.4'
}

// Define the main class for the application
mainClassName = 'App'

test {
    doLast {
        tasks.jacocoTestReport.execute()
    }
}

jacocoTestReport {
    reports {
        xml.enabled = false
        html.enabled = true
        html.destination = "${buildDir}/reports/jacoco"
    }
}

tasks.withType(FindBugs) {
    reports {
        xml.enabled = false
        html.enabled = true
    }
}

tasks.withType(Checkstyle) {
    reports {
        xml.enabled false
        html.enabled true
        html.destination = "${buildDir}/reports/checkstyle/checkstyle.html"
    }
}

jar {
    manifest {
        attributes 'Implementation-Title': 'Test App.'
        attributes 'Implementation-Version': 1.0
        attributes "Main-Class" : "App"
    }
    from configurations.compile.collect { it.isDirectory() ? it : zipTree(it) }
}

動くか試す。

> gradlew.bat build

うん、一通りレポート出力されているっぽい。

とりあえずこんなものでいいか。

2017/03/09

YukiTask を MSYS2 on Windows 環境で試した

結城タスク / YukiTask - A Simple Task Manager for Command Line Lovers. が気になったので、 Windows で使えないか試行錯誤してみた。その作業記録。

前提環境

  • OS : Windows 10 Pro 64bit
  • MSYS2 環境インストール済み
    • /etc/fstab/C/Users/mikoto を指定しているので、「Windows のホームディレクトリ == MSYS2 環境のホームディレクトリ」になっている状態
  • RubyInstaller for Windows の 2.3.3 をインストール済みなので、これを使用する

作業ログ

Setup YukiTask を参照しながらセットアップ。 (今回はお試しなので、 .bashrc に追記しないで試している。)

$ cd ~project
$ wget https://github.com/hyuki0000/yukitask/archive/master.zip
$ unzip master.zip
$ cd yukitask-master
$ mv yukitask/ ~

$ export EDITOR=~/app/vim80-kaoriya-win64/gvim.exe
$ export PATH=~/yukitask:$PATH
$ export PATH=$PATH:/C/Ruby23-x64/bin/
$ source ~/yukitask/command_aliases
$ source ~/yukitask/here_aliases

導入はできたはずなので YukiTask TODO management を試してみる。

$ mkdir ~/project/yukitask_practice
$ cd ~/project/yukitask_practice
$ here yukitask_practice
'pbcopy' は、内部コマンドまたは外部コマンド、
操作可能なプログラムまたはバッチ ファイルとして認識されていません。
~/yukitask/here_aliases is updated.
alias yukitask_practice='pushd C:/Users/mikoto/project/yukitask_practice; show_todo'
Execute Command+V on the command line to update aliases.

pbcopy がないのか...。 pbcopy の代替設定を行って再挑戦。

$ function pbcopy() {
>     echo $* > /dev/clipboard
> }
$ cd ~/project/yukitask_practice
$ here yukitask_practice
'pbcopy' は、内部コマンドまたは外部コマンド、
操作可能なプログラムまたはバッチ ファイルとして認識されていません。
~/yukitask/here_aliases is updated.
alias yukitask_practice='pushd C:/Users/mikoto/project/yukitask_practice; show_todo'
Execute Command+V on the command line to update aliases.

あー...。 ~/yukitask/here が Ruby スクリプトで、 system() でコマンド実行しているから functioin で関数定義するだけじゃ無理なのか。

処理内容を見る限り、ペーストでの ~/yukitask/here_aliases の再読み込みができないだけで ~/yukitask/here_aliases の更新自体はされているようなので保留とする。

更新時は source ~/yukitask/here_aliases を自力で打つ感じで。

ということで続きをやってみる。

$ cd
$ yukitask_practice
~/project/yukitask_practice ~
bash: /home/mikoto/yukitask/show_todo: /usr/bin/ruby: 誤ったインタプリタです: No such file or directory

oh...。~/yukitask/show_todo の shebang が /usr/bin/ruby になっているから ruby が見つからない。 #!/usr/bin/ruby#!/usr/bin/env ruby に書き換えて実行。

あ、あと、関係ないけど移動は pushd でやっているのね。

$ cd
$ yukitask_practice
~/project/yukitask_practice ~
cat: '$HOME/yukitask/TODO': No such file or directory

えーと、今度は、ホームディレクトリを表すのに $HOME を使用しているから、 Windows ネイティブのの Ruby からだと環境変数が見えないのか。

$HOME~ に修正して試してみる。

$ yukitask_practice
~/project/yukitask_practice ~
This is your global TODO file.
Use 'TT' command to edit this file.

ok。 続きを実施。

$ T # TODO 修正
$ cd
$ yukitask_practice
~/project/yukitask_practice ~ ~
This is your global TODO file.
Use 'TT' command to edit this file.
yukitask_practice's TODO

ちゃんと動いているっぽい。

続いて YukiTask Make を試す。 さっき使ったプロジェクトをそのまま流用。

$ cd ~/project/yukitask_practice
$ cp ~/yukitask/makefile.default makefile
$ m # エディタで makefile が開かれる
$ mk
You are executing 'mk' command. Please edit your 'makefile'.

こちらも大丈夫そう。

ちゃちゃっと試していきましょう。 次は YukiTask Graph

$ start ~/yukitask/graph-recent.html # 空白のページが表示された

あれー??? ~/yukitask/touch_task あたりが原因かな?とあたりを付けてソースを読む。

~/yukitask/touch_tasksystem("update_graph") が怪しいので、 とりあえず ~/yukitask/update_graph 単独で実行してみる。

$ cd ~/project/yukitask_practice
$ update_graph
$ start ~/yukitask/graph-recent.html # グラフが表示された

これは、 Windows ネイティブの Ruby 使っているから PATH が通っていないんだなきっと。

うーん、MSYS2 環境から Windows ネイティブ Ruby 呼ぶのが間違いなきがしてきた。 とはいえ MSYS2 の Ruby 入れると使い分けとかいろいろややこしくなりそう。

面倒なので bash 経由で呼び出すように修正した。 bash なら環境変数よしなに取り扱ってくれそうだし。

%s/system("update_graph")/system("bash -c \\\"\~\/yukitask\/update_graph\\\"") 的な感じで書き換えて再挑戦。

$ cat /dev/null > ~/yukitask/graph-recent.html
$ mk
$ start ~/yukitask/graph-recent.html # グラフが表示された

何となく mk の実行時間長くなった気がするけどとりあえずグラフの更新は成功した。

感想

MSYS2 の packman でインストールできる ruby を使うようにすれば、 今回つまずいた中のいくつかは回避できるんじゃないかな? 特にこだわりが無いのであればそちらを推奨。

yukitask 自体の設定ファイル的な存在が makefile なので、 プロジェクトルートに Makefile が存在するようなプロジェクトの管理はできなそう。 (昨今そんなプロジェクトはめったにないけれど)

基本的な設定は ~/yukitask 下で管理されているので、 プロジェクトルート直下の TODOmakefile.gitignore に登録すれば、 公開前提のプロジェクトでもいい感じに管理できそう。 (場合によっては TODO すら ignore 設定しなくてもよい感じ)

ここまで試してみて、グラフ表示に魅力を感じてきているので、使い方を模索しつつなるべく体をなじませていきたい感じ。

参考資料

2017/02/19

AArch64 armasm の勉強 システムレジスタの値を取得する実習

前々回前回で、システムレジスタについてと、 C 言語から armasm のサブルーチンを呼び出す方法が分かった気がする。 なので、実際にプログラムを作成してレジスタの値が取得できるかを確かめる。

前提

この辺の作業で使った環境を引き続き使用している。

作成したプログラム

main.c

#include <string.h>
#include <types.h>
#include <uart.h>

#include "SystemRegisters.h"

#define BUF_LENGTH 255

int main() {

    char cbuf[BUF_LENGTH];

    uint32 daifFlags = daif();
    ltoa(daifFlags, cbuf, BUF_LENGTH, 2);
    print("daifFlags = ");
    println(cbuf);

    uint32 nzcvFlags = nzcv();
    ltoa(nzcvFlags, cbuf, BUF_LENGTH, 2);
    print("nzcvFlags = ");
    println(cbuf);

    while (1);

    return 0;
}

SystemRegisters.h

#include <types.h>

extern uint32 daif();
extern uint32 nzcv();

SystemRegisters.S

.global daif
daif:
    MRS X0, DAIF
    RET
.global nzcv
nzcv:
    MRS X0, NZCV
    RET

とりあえずこれで確認してみる。

実行結果は下記。

daifFlags = 1111000000
nzcvFlags = 1100000000000000000000000000000

printf を実装してないから表示がちょっと残念だけど、 下記、条件フラグの記載を見る限り、 DAIF フラグが全部立ってるので、割り込みはすべて Disable であることと、 Z, C フラグが立ってることを確認できた???

とりあえず今日はここまで。 明日はこれでいろいろなレジスタの状態を確認していってみようか。

2017/02/16

AArch64 armasm の勉強 サブルーチン編

前回(親知らずの日記: AArch64 armasm の勉強 システムレジスタ編)、システムレジスタの値を MRS, MSR で読み書きできそうということが分かったので、取得した値を表示してみたい。

そのためには、 C 言語から armasm のサブルーチンを呼び出せるようにしないといけない。

そのあたりの勉強をする。

座学

ARM Information Center - ARM® コンパイラ armasm ユーザガイド を見てみたが、 AArch64 の章に、サブルーチンに関する話が載っていなかった。

仕方がないので ARM Information Center - 6.3 サブルーチン呼び出しでのレジスタの使用方法 を参照する。

これによると、

  • レジスタ 0 から 3 までを引数用に使用
  • レジスタ 0 を 戻り値用に使用
  • サブルーチン呼び出しには BL 命令を使用
  • サブルーチンからの復帰には BX LR 命令を使用

のようだ。

それぞれの命令の意味を確認しようと思ったら、 ARM Information CenterBX 命令がない...。「復帰」で検索かけたら RET 命令が見つかった。AArch64 では RET 命令でサブルーチンからの復帰を行うみたい。

ここまでわかったので、実際作ったプログラムをアセンブリプログラムに変換して確かめてみる。

実践

検証環境

ツールチェインは gcc-linaro-6.2.1-2016.11-i686-mingw32_aarch64-linux-gnu

検証用プログラムの作成

caller.c

extern int getOne(void);
extern int add(int a, int b);

int main() {

    int one = getOne();

    int number = add(1, 2);

    while (1);

    return 0;
}

callee.c

int getOne() {
    return 1;
}

int add(int a, int b) {
    return a + b;
}

上記の C コードをアセンブリコードへ変換する。

アセンブリコードの確認

aarch64-linux-gnu-gcc -S ./caller.c -o caller.S
aarch64-linux-gnu-gcc -S ./callee.c -o callee.S

で、結果が下記。

caller.S

    .arch armv8-a
    .file   "caller.c"
    .text
    .align  2
    .global main
    .type   main, %function
main:
    stp x29, x30, [sp, -32]!
    add x29, sp, 0
    bl  getOne
    str w0, [x29, 28]
    mov w1, 2
    mov w0, 1
    bl  add
    str w0, [x29, 24]
.L2:
    b   .L2
    .size   main, .-main
    .ident  "GCC: (Linaro GCC 6.2-2016.11) 6.2.1 20161016"
    .section    .note.GNU-stack,"",@progbits

callee.S

    .arch armv8-a
    .file   "callee.c"
    .text
    .align  2
    .global getOne
    .type   getOne, %function
getOne:
    mov w0, 1
    ret
    .size   getOne, .-getOne
    .align  2
    .global add
    .type   add, %function
add:
    sub sp, sp, #16
    str w0, [sp, 12]
    str w1, [sp, 8]
    ldr w1, [sp, 12]
    ldr w0, [sp, 8]
    add w0, w1, w0
    add sp, sp, 16
    ret
    .size   add, .-add
    .ident  "GCC: (Linaro GCC 6.2-2016.11) 6.2.1 20161016"
    .section    .note.GNU-stack,"",@progbits

まとめ

ドキュメントに書いてある通り、引数と戻り値を設定しているみたい。 そして、復帰は RET 使っている。

サブルーチン側では、

  1. スタック領域確保する
  2. スタックに引数を積み上げる
  3. サブルーチンの処理結果をレジスタ 0 に格納する
  4. 確保したスタック領域を返却する

のような流れっぽい。 スタックは、アドレスの少ないほうに伸びていくっぽい。

本日はここまで。 明日、余裕があったら引数の数増やして確認してみる。

2017/02/15

AArch64 armasm の勉強 システムレジスタ編

BareMetalで遊ぶ Raspberry Pi - 達人出版会 を参照しながら Raspberry Pi 3 Model B+ でベアメタルタイマー割り込みやろうとしたのだけど、 AArch64 でやろうとするといろいろ勝手が違うらしいのでそこのところを勉強する。

元ネタ資料はこれら

レジスタ概要を把握するため、ARM Information Center - 章 4 AArch64 状態の概要 を一通り読んだ。

不正確な箇条書きで書くとこんな感じらしい。

  • レジスタ概要
    • 汎用レジスタ 30 本
      • プログラム内で好き勝手適当に使えるレジスタ群
      • X30 で 64 bit レジスタとしてアクセス
      • W30 で 32 bit レジスタとしてアクセス(上 32 bit はゼロクリアされる)
      • X30, W30 はリンクレジスタ
    • PC(プログラムカウンタ)
      • 次に実行するアドレスが格納されるレジスタ
      • 直接値を変更することはできない、特定の命令で書き換えるらしい
    • SP(スタックポインタレジスタ)
      • スタックを実現するために使うレジスタ
      • 命令一つで格納とインクリメントをしてくれるとかそういうの???
      • サブルーチンの引数なんかをスタックするのに使うらしい
      • 例外レベル 0 から 3 までにそれぞれ専用のレジスタをもつ
      • アセンブラの命令によっては X31, W31 でアクセスできるらしい
    • SPSR(セーブドプログラムステータスレジスタ)
      • 例外発生時にその時点での状態を記録してくれるレジスタ
      • 例外レベル 1 から 3 までに専用のレジスタが一つずつある
      • 例外が発生すると、現在のステータスが遷移先の SPSR に格納される
      • SPSR が格納する情報は下記の通り
        • N, Z, C, V フラグ
        • D, A, I, F 割り込み Disable ビット
        • レジスタ幅
        • 実行モード
        • IL, SS ビット
    • LR(リンクレジスタ)
      • サブルーチン呼び出し時に復帰アドレスを格納する
    • ELR(例外リンクレジスタ)
      • 例外発生時に復帰アドレスを格納する
      • 例外レベル 1 から 3 にそれぞれ専用のレジスタがある
        • 設定によっては例外レベルでレジスタを使い分けないこともできるらしい
  • 例外レベルとは
    • それぞれのレベルで下記のような感じらしい。それぞれの意味はよく分からない。
      • EL0 : アプリケーション
      • EL1 : 特権付き
      • EL2 : ハイパーバイザ
      • EL3 : セキュアモニタ
  • AArch64 でのプロセス状態書き込み・読み込み方法
    • プロセス状態としてアクセスできる情報は下記の通り
      • N,Z,C,V フラグ(NZCV)
      • 現在のレジスタ幅(nRW)
      • スタックポインタ選択ビット(SPSel)
      • 割り込み Disable フラグ(DAIF)
      • 現在の例外レベル(EL)
      • シングルステッププロセス状態ビット(SS)
      • 不正な例外復帰状態ビット(IL)
    • MSR 命令で書き込めるもの
      • NZCV
      • DAIF
      • SPSel(EL1以上)
    • MRS 命令で読み取れるもの
      • NZCV
      • DAIF
      • CurrentEL の例外レベルビット(EL1 以上)
      • SPSel(EL1 以上)

BareMetalで遊ぶ Raspberry Pi - 達人出版会 内で CPSR にアクセスしている部分は、大体 MSR, MRS で置き換えられるのかな?

ARM Information Center - ARM Cortex-A53 MPCore Processor Technical Reference Manual に書かれているレジスタなんかも、 MSR, MRS 命令で読み書きするみたい。

とりあえず今日はここまで。

2017/01/22

Windows 上で Raspberry Pi 3 Model B+ 64 bit の U-Boot イメージをビルド

Windows 上で Raspberry Pi 3 Model B+ の U-Boot イメージをビルドする手順を書いていく。

ただし、 U-Boot イメージのビルドには Bash on Ubuntu on Windows を使用する。

前提条件

U-Boot の準備

ネットワークブートに必要な U-Boot のビルドと設定を行う。 MSYS2 上でのビルドに成功しないので、この作業は Bash on Ubuntu on Windows 上で行う。 このセクションの作業はすべて Bash on Ubuntu on Windows 上で行う。

必要パッケージのインストール

sudo apt install git gcc-aarch64-linux-gnu device-tree-compiler

U-Boot の取得とビルド

mkdir ~/project
cd ~/project
git clone git://git.denx.de/u-boot.git
cd ~/project/u-boot
export CROSS_COMPILE=aarch64-linux-gnu-
make rpi_3_defconfig
make all

ブートスクリプトの作成

Raspberry Pi 起動時に、 TFTP サーバーへ接続してイメージのロードと実行を行うスクリプトを作成する。

boot.txt を、下記の通り作成する。

dhcp 0x80000 192.168.2.100:kernel8.img
go 0x80000

boot.txt を、 boot.scr に変換する。

/PATH/TO/u-boot/tools/mkimage -A arm -O linux -T script -C none -a 0 -e 0 -n "PXE Boot" -d boot.txt ./boot.scr

ここで作成した boot.scr を、 U-Boot 起動時に読み込ませることで、 TFTP サーバー 192.168.2.100kernel8.img をイメージとして取得・ロードしてくれるようになる。

ネットワーク設定

ノート PC の無線 LAN を WAN に、有線を Raspberry Pi 3 に接続する。 そのままだと、有線が優先されるせいか WAN に出れないので、有線 LAN アダプタの設定を行う。

  1. 「タスクトレイのネットワークアイコンを右クリック -> ネットワーク共有センターを開く」選択
  2. 「アダプターの設定の変更」を選択
  3. 「イーサネットを右クリック -> プロパティ」を選択
  4. 「インターネットプロトコル バージョン 4(TCP/IPv4)」をダブルクリック
  5. 「次の IP アドレスを使う」を選択
  6. 下記通りに設定
    • IP アドレス : 192.168.2.100
    • サブネットマスク : 255.255.255.0
    • デフォルトゲートウェイ : 192.168.2.1
    • 他は空欄のままでよい

SD カードの準備

  1. ビルドした成果物の u-boot.bin を SD カードのルートにコピーする
  2. 下記ページのファイルをすべて SD カードのルートにコピーする。
  3. boot.scr を SD カードのルートにコピーする
  4. config.txt を書き換える

config.txt の書き換え後の内容

enable_uart=1
arm_control=0x200
kernel=u-boot.bin

TFTPD の準備

TFTPD の取得

下記ページから tftpd64 standard edition (zip) をダウンロードする。

TFTPD の設定

ダウンロード・展開してできた tftpd64.exe を起動し、 Setting ボタンを押下。

グローバル設定画面で、 TFTP Server と DHCP Server を使用するように設定。

TFTPD 設定画面でいろいろ設定する。

  • Base Directory
    • TFTP で公開するディレクトリのルート( kernel8.img を置く。今回は C:\\Users\\mikoto\\project\\raspberrypi_bare_metal\\ftproot を設定)
  • 下記チェックボックスにチェック
    • Option negotiation
    • Show Progress bar
    • Translate Unix file names
    • Bind TFTP to this address
      • 192.168.2.100 (自分が Listen する IP アドレスを入力)

DHCPD 設定画面でもいろいろ設定する。

  • この辺直感で設定したので根拠なし。誰かツッコミあればお願いしますって感じで。

OK ボタンを押下。

これで、TFTP のファイルを公開すると同時に、 PC と Raspberry Pi を繋げたときに、 Raspberry Pi に対して IP を設定してくれるようになる。

物理的な準備

  1. SD カードを Raspberry Pi に挿入
  2. PC と Raspberry Pi を LAN ケーブルで繋げる
  3. PC と Raspberry Pi を UART ケーブルでつなげる

ファイルの準備

実行したいプログラム( kernel8.img ) を TFTP のルートディレクトリにコピー

実行

Raspberry Pi の電源を入れる

Raspberry Pi を再起動するたび、 TFTP のルートディレクトリに格納した kernel8.img が実行されるようになっている。

感想

  • U-Boot, 積極的に使っていきたい。
  • とりあえず目的は達成できたので満足。
  • U-Boot のビルドに Ubuntu を使ったのが悔しくて仕方ない。

参考文献

以上。

2016/12/25

Raspberry Pi Model B+ でベアメタル UART 出力ユーティリティ化

前回、 親知らずの日記: Raspberry Pi 3 Model B+ でベアメタル UART 出力 では、 UART で受信した文字をエコーバックするプログラムを作成した。

プログラム内で任意の文字列を出力させるため、ユーティリティ化したい。

目的

デバッグ目的で UART に任意文字列を出力したい。

こんな感じで使いたい。

int main(void) {

    println("Hello, World!");

    error_code = function();
    print("error_code: ");
    print(error_code);
    println(".");

    return 0;
}

要素技術

  1. UART 出力
  2. '数値 -> 文字列' 変換

UART 出力

こんな感じになった。

uart.h

#ifndef __UART_H__
#define __UART_H__

/**
 * Mini Uart 送受信に使用するレジスタ。
 *
 * 書き込むと送信 FIFO にプッシュ,
 * 読み込むと 受信 FIFO からポップしてくれる素敵仕様らしい。
 */
#define MU_IO (*(volatile unsigned int *)0x3F215040)

/**
 * Mini Uart 送信 FIFO の状態確認をするための情報が入ったレジスタ。
 *
 * 6 ビット目 : Transmitter idle, アイドル状態か?
 *              1: アイドル状態, 0: ビジー状態
 * 5 ビット目 : Transmitter empty, 1 バイト以上送信受付可能か?
 *              1: 可能, 0: 不可能
 * 0 ビット目 : Data ready, 1 バイト以上受信しているか?
 *              1: 受信している, 0: 受信していない
 */
#define MU_LSR          (*(volatile unsigned int *)0X3F215054)

/* Transmitter idle のビットマスク */
#define MU_LSR_TX_IDLE  (1U << 6)

/* Transmitter empty のビットマスク */
#define MU_LSR_TX_EMPTY (1U << 5)

/* Data ready のビットマスク*/
#define MU_LSR_RX_RDY   (1U << 0)

void println(const char* chars);
void print(const char* chars);
void uart_put(const char c);

#endif // __UART_H__

uart.c

#include "uart.h"

/* あとで types.h に追い出す */
typedef unsigned int size_t;

void println(const char* chars) {
    print(chars);
    print("\n\r");
}

void print(const char* chars) {
    char* char_ptr = (char*) chars;

    while (*char_ptr != '\0') {
        uart_put(*char_ptr);
        char_ptr++;
    }
}

void uart_put(const char c) {
    // 送信受付可能状態になるまでビジーループ
    while (!(MU_LSR & MU_LSR_TX_IDLE) && !(MU_LSR & MU_LSR_TX_EMPTY));

    // IO レジスタにデータ書き込み
    MU_IO = c;
}

'数値 -> 文字列' 変換

これはこんな感じ。

string.h

#ifndef __STRING_H__
#define __STRING_H__

unsigned char ltoa_10(const long l, char* str, const int max_length);

#endif // __STRING_H__

string.c

#include "string.h"

/**
 * @fn 10 進数値を文字列へ変換する
 * @param (l)          変換対象数値
 * @param (str)        変換後の文字列を格納するバッファへのポインタ
 * @param (max_length) 変換後の文字列を格納するバッファの長さ
 * @return エラーコード
 *         0 : 正常終了
 *         1 : 変換後文字列を格納するバッファの長さが足りなかった
 */
unsigned char ltoa_10(const long l, char* str, const int max_length) {
    unsigned int  i;
    unsigned long tmp_long_value = l < 0 ? -l : l;
    unsigned char tmp_digit_value;
    unsigned int  length = 0;

    // 桁の数値と文字を対応付けする配列
    const char cmap[]
            = { '0', '1', '2', '3', '4', '5', '6', '7', '8', '9' };

    // ゼロ判定, ゼロならさっさと返却する
    if (l == 0) {
        if (max_length < 2) {
            return 1;
        }

        str[0] = '0';
        str[1] = '\0';

        return 0;
    }

    // 桁数判定
    while (tmp_long_value != 0) {
        tmp_long_value = tmp_long_value / 10;
        length++;
    }
    if (l < 0) {
        length++;
    }

    // バッファ長上限判定(NULL 文字を含めるので +1 する)
    // 上限を超えていたら 1 を返却
    if (length + 1 > max_length) {
        return 1;
    }

    // 文字列変換

    // 文字列変換開始インデックス
    i = length - 1;

    // NULL 文字追加
    str[length] = '\0';

    // 各桁の変換
    tmp_long_value = l < 0 ? -l : l;
    while (tmp_long_value != 0) {
        tmp_digit_value = tmp_long_value % 10;
        str[i] = cmap[tmp_digit_value];
        i--;
        tmp_long_value = tmp_long_value / 10;
    }

    // 負数処理
    if (l < 0) {
        str[0] = '-';
    }

    return 0;
}

使い方

こんな感じで使えるようになった。

#include <string.h>
#include <uart.h>

#define BUF_LENGTH 5

int main(void) {

    char cbuf[BUF_LENGTH];

    println("Hello, World!");

    error_code = function();
    ltoa_10(error_code, cbuf, BUF_LENGTH);

    print("error_code: ");
    print(error_code);
    println(".");

    return 0;
}

成果物

この辺りをユーティリティとしてまとめたうえで、 gcc で挙動テスト(string.c のみ)するようにしたものが下記 URL にある。

これでデバッグプリントできるようになったので、 HDMI 出力できない問題を追いかけていく。 (しかし SD カード抜き差しが非常に厳しい...)

以上。

2016/12/24

Windows 10 に mikutter 3.4.8 をインストールした

わけあって moguno/mikutter-windows に頼らずに windows にインストールしてみたいと思い、実際やってみたので作業を記録する。

環境まとめ

  • OS: Windows 10 Pro
  • Ruby: 2.3.3

Ruby 入手

  • RubyInstaller Downloads
    • Ruby 2.3.3 (x64) をダウンロード
      • パスを通す設定をしてください
    • DevKit-mingw64-64-4.7.2-20130224-1432-sfx.exe をダウンロード

mikutter ソースコード入手

git インストール済みなのでクローンする。

git clone git://toshia.dip.jp/mikutter.git

mikutter に必要な gem たちのインストール

DevKit を展開してできた msys.bat を実行。

cd /PATH/TO/mikutter
gem install bundler
bundle install --path vendor/bundler

mikutter 実行

bundle exec で起動。

cd /PATH/TO/mikutter
bundle exec ruby mikutter.rb

ショートカット作成

まずはスタート用のバッチファイルを作る。

cd /PATH/TO/mikutter
echo start rubyw mikutter.rb> mikutter.bat

作成したバッチファイルへのショートカットをデスクトップに作る。

TODO

  • display_display_requirements
  • 別窓で画像開くやつの画像が表示されない
  • 音を出す
    • 今は音が鳴らない moguno/mikutter-windows のサウンドプラグイン単独配布してくれないかなぁ...。
  • アイコン
    • ショートカットアイコンに png 指定できないの辛い

音とアイコンについては moguno/mikutter-windows で実現されているので、真似して作業していく。

Raspberry Pi 3 Model B+ でベアメタル UART 出力

前回に引き続き、今回も下記サイトを参考にベアメタルプログラミングをしていく。

今回は UART でのデータ送受信。

参考ページは下記。

必要なハードウェアの調達

UART するには通信ケーブルが必要なので調達した。

ドライバは下記ページを参考にした。

UART を使用するための設定

config.txt を作成し、 enable_uart=1 を記述。 あとで SD カードのルートに格納する。

この辺は今のところ「おまじない」としておく。

このおまじないをすると、 GPU が Mini UART を使えるようにしてくれるようになるらしい。 そのため、我々は、 UART の初期化コードを書くことなくプログラミングできるっぽい。

UART を使うためのレジスタの確認

使うレジスタ

BCM-ARM-Peripherals.pdf の 8 ページ目から UART のレジスタについて説明されている。

今回使うのは、 AUX_MU_LSR_REG(Mini Uart Line Status)AUX_MU_IO_REG(Mini Uart I/O Data)

Raspberry Pi 3 なので、上位アドレスを読みかえ、それぞれ 0x3F215054, 0x3F215040 となる。

ステータスレジスタについて

AUX_MU_LSR については、BCM-ARM-Peripherals.pdf の 15 ページ目に説明が書いてあるみたい。

プログラム作成

/**
 * Mini Uart 送受信に使用するレジスタ。
 *
 * 書き込むと送信 FIFO にプッシュ,
 * 読み込むと 受信 FIFO からポップしてくれる素敵仕様らしい。
 */
#define MU_IO (*(volatile unsigned int *)0x3F215040)

/**
 * Mini Uart 送信 FIFO の状態確認をするための情報が入ったレジスタ。
 *
 * 6 ビット目 : Transmitter idle, アイドル状態か?
 *              1: アイドル状態, 0: ビジー状態
 * 5 ビット目 : Transmitter empty, 1 バイト以上送信受付可能か?
 *              1: 可能, 0: 不可能
 * 0 ビット目 : Data ready, 1 バイト以上受信しているか?
 *              1: 受信している, 0: 受信していない
 */
#define MU_LSR          (*(volatile unsigned int *)0X3F215054)
#define MU_LSR_TX_IDLE  (1U << 6) /* Transmitter idle のビットマスク */
#define MU_LSR_TX_EMPTY (1U << 5) /* Transmitter empty のビットマスク */
#define MU_LSR_RX_RDY   (1U << 0) /* Data ready のビットマスク*/

int main(void) {

    // 受信文字列格納用
    volatile char ch;

    while (1) {
        // 受信するまでビジーループ
        while (!(MU_LSR & MU_LSR_RX_RDY));

        // 受信データ記録
        ch = (char)MU_IO;

        // 送信受付可能状態になるまでビジーループ
        while (!(MU_LSR & MU_LSR_TX_IDLE) && !(MU_LSR & MU_LSR_TX_EMPTY));

        // IO レジスタにデータ書き込み
        MU_IO = (unsigned int)ch;
    }

    return 0;
}

配線

元ネタのページにも記載されているが、ピン番号はこちらで確認した。

まじめな人はこれと BCM2835-ARM-Peripherals.pdf を見比べて、 仕様書の見方に慣れていくのが良いかと。 (多分 102 ページ目からの説明とか 176 ページ目からの説明とかが対応する記述なのだと思う。)

購入した変換ケーブルの説明を見ると、下記のようになっている。

ブラックケーブル ----- GND
グリーンケーブル ----- TXD
ホワイトケーブル ----- RXD
レッドケーブル ------- VCC - 5V

というわけで、下記感じで配線する。

PIN  6(GND) ----- ブラック(GND)
PIN  8(GPIO14) -- ホワイト(RXD)
PIN 10(GPIO15) -- グリーン(TXD)

動作確認

  1. SD カードに bootcode.bin, start.elf, config.txt, kernel8.img をコピーして、Raspberry Pi に挿す
  2. PC に変換ケーブルを挿す
  3. シリアルコンソールを起動し、 Com の設定を行う(後述)
  4. Raspberry Pi に電源供給
  5. 入力文字がエコーバックされれば OK

シリアルコンソールについて

今回は、 RLogin を使用することとした。 sixel 関係で使っていて、使い慣れていたので。

設定は、下記のようにすれば OK のはず。

  • ビット/秒 : 115200
  • データビット : 8
  • パリティ : なし
  • ストップビット : 1
  • フロー制御 : ハードウェア

以上。

2016/12/19

Raspberry Pi 3 Model B+ で、 OS 無し L チカした

Raspberry Pi でベアメタルプログラミンしたかったので、 いろいろ調べた作業記録を残す。

参考資料を探す

とりあえず、自分のレベルに合っていて、 かつ、わかりやすそうなサイトを探す。

...で、見つかったのがこのサイト。

基本ここを参考に環境構築とかしていくこととする。

必要なハードウェア類の調達

L チカに必要なものを買い集める。

必要なソフトウェア類の調達

ビルド環境構築

ダウンロードした gcc-linaro-6.2.1-2016.11-i686-mingw32_aarch64-linux-gnu.tar.xz を適当な場所に展開し、 bin ディレクトリにパスを通す。

L チカプログラムの作成

プログラムを作ってビルドする。

ファイル作成

こんな配置でファイルを作成する。

led_blink_GPIO16
├── main.c
├── Makefile
└── start.S

start.S

/* 現時点ではおまじないスタート地点を調整しているはず */
mov sp, #0x80000
bl  main

main.c

#define GPFSEL1 0x3F200004 /* GPIO のピン設定をするためのレジスタ */
#define GPSET0  0x3F20001C /* GPIO を HIGH にするためのレジスタ */
#define GPCLR0  0x3F200028 /* GPIO を LOW  にするためのレジスタ */

typedef unsigned char bool;

#define TRUE  1
#define FALSE 0

#define WAIT_COUNT 3000000

/*
 * @fn wait_count だけビジーウェイトする
 * @param (wait_count) このカウント数だけビジーウェイトする
 */
void busy_wait(int wait_count);

/*
 * @fn L チカする
 */
int main(void) {

    // GPIO 出力に設定。
    // Peripheral specification の
    // 92 ページ、Field Name が FSEL16 の行の
    // Bit(s) を見ると、18 から 20 ビット目までに
    // 0x001 を設定すればよいことがわかる感じ。
    *(volatile unsigned int*)GPFSEL1 = (1 << (18));

    // セットして待つ、クリアして待つ、を繰り返す。
    while (1) {
        *(volatile unsigned int*)GPSET0 = (1 << 16);
        busy_wait(WAIT_COUNT);
        *(volatile unsigned int*)GPCLR0 = (1 << 16);
        busy_wait(WAIT_COUNT);
    }

    return 0;
}

void busy_wait(int wait_count) {
    volatile unsigned int i;

    for (i = 0; i < WAIT_COUNT; i++);
}

Makefile

CC=aarch64-linux-gnu-gcc
LD=aarch64-linux-gnu-ld
AS=aarch64-linux-gnu-as
OBJCOPY=aarch64-linux-gnu-objcopy

OBJECTS=start.o main.o

all: build link objcopy

objcopy: kernel8.img

kernel8.img: kernel8.elf
    $(OBJCOPY) -O binary kernel8.elf kernel8.img


link: kernel8.elf

kernel8.elf: $(OBJECTS)
    $(LD) -Ttext 0x80000 -o kernel8.elf $(OBJECTS)


build: $(OBJECTS)

start.o: start.S
    $(AS) -o start.o start.S

main.o: main.c
    $(CC) -c -o main.o main.c


clean:
    rm *.o *.elf *.img

ビルド

make して kernel8.img を作成する。

$ make
aarch64-linux-gnu-as -o start.o start.S
aarch64-linux-gnu-gcc -c -o main.o main.c
aarch64-linux-gnu-ld -Ttext 0x80000 -o kernel8.elf start.o main.o
C:\Users\mikoto\app\gcc-linaro-6.2.1-2016.11-i686-mingw32_aarch64-linux-gnu\bin\aarch64-linux-gnu-ld.exe: warning: cannot find entry symbol _start; defaulting to 0000000000080000
aarch64-linux-gnu-objcopy -O binary kernel8.elf kernel8.img

リンカスクリプトを作っていないため、 警告が出ているけど、今回動かす分には問題ない。

Raspberry Pi の準備

ファイルの配置

  1. ダウンロードした firmware_armstub.zip を展開し、bootcode.bin, start.elf を SD カードのルートにコピーする
  2. ビルドした、 kernel8.img を SD カードのルートにコピーする

最終的に、 SD カードに下記感じでファイルを配置する。

SD カード
├── bootcode.bin
├── start.elf
└── kernel8.img

配線

下記感じで配線する。

PIN 36(GPIO16) ─ 抵抗 ─ LED
PIN 6(GND) ────────┘

実行

  1. Raspberry Pi に SD カードを入れる
  2. Raspberry Pi に電源供給

以上。

参考資料

この辺を見て試したはず...。ぬけもれあるかも。

2016/12/13

vim のアウトライン表示プラグイン outline.vim を作った

c 言語の関数一覧が欲しかったので作ったので、 そのあたりの作業について備忘メモしておく。

名前負けはご愛敬。

目的

c 言語の関数一覧が欲しかった。

何を考えたか?

c 言語の関数一覧が欲しいけど、 自分で抽出処理はかけない。

そんなわけで、方針としては

以下、各要素について書いていく。

アウトライン抽出

アウトライン抽出は ctags を使う。

ctags -x FILE_NAME --sort=no

これで member, struct, function のリストが表示される。 ここから member を取り除き、awk で無用な列を削除する。

ctags -x FILE_PATH --sort=no | grep -v member | awk '{$1=\"\";$2=\"\";$3=\"\" + $3;$4=\"\";print}'

これを、vim のバッファに読み込ませるには、 read! コマンドを使う。

silent execute "read !ctags -x " . file_path . " --sort=no | grep -v member | awk '{$1=\"\";$2=\"\";$3=\"\" + $3;$4=\"\";print}'"

これで、 ctags の実行結果を成形したものをバッファに読み込むことができる。

対象にジャンプ

ctags を成形した結果は、各行が 行番号 関数名 となっているので、 split してリストの 0 番目をとってきて、元のバッファに戻って [count]gg すれば OK。

で、できたのが下記な感じ。

以上。

2016/12/04

ファイル検索プラグイン file_selector.vim を作った

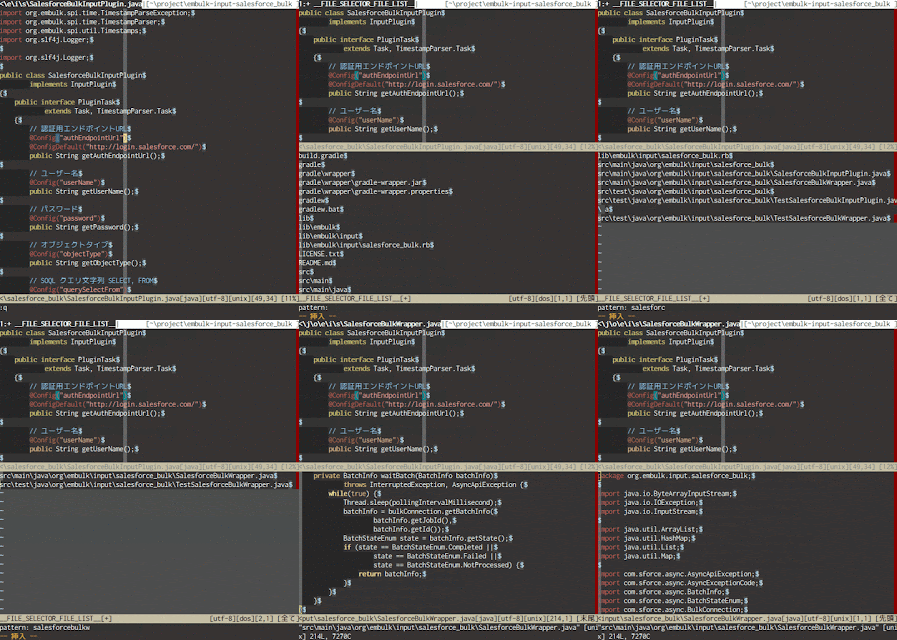
ファイル一覧を絞り込んで選択するやつを作ったので、 そのあたりの作業について備忘メモしておく。

目的

netrw でファイルを開くのが面倒。 プロジェクト内のファイル一覧から、文字列打ち込んで絞り込みつつファイル選択したい。 この欲望を満たすプラグインを作る。

何を考えたか?

ファイル絞り込みの構成要素としては、

  1. ファイル一覧取得
  2. 入力文字列取得
  3. 入力文字列を使った絞り込み処理
  4. バッファへの反映

みたいなのがあると思っていて、 2 と 4 のイメージがついてなくって途方に暮れていたところ、 @pink_bangbi さんにつぶやきを拾っていただいた。

そんなわけで、方針としては

  • 文字列取得は InsertCharPre から一文字ずつ取得
  • バッファは全部書き直し

の方針で考えた。

構成要素の実現方法を考える

それぞれ考えていく。

ファイル一覧取得

単純に glob("./**/*") とする。

入力文字列取得

autocmdInsertCharPre を捕まえる。

入力文字列を使った絞り込み処理 + バッファへの反映

v/文字列/d で、文字列が含まれていない行を削除できるので、

  1. バッファクリア
  2. glob("./**/*") で取得した一覧をバッファに流し込む
  3. v/文字列/d で関係ない行を削除

を、文字列入力・削除が行われるたびに実行する。

文字列のハンドリング

InsertCharPre で取得するのはいいけど、それどう管理するの?」を考える。

  • ファイル一覧
    • ファイル一覧はスクリプト変数
    • ファイル絞り込み用バッファを開くときに、``glob("./**/*") する
  • 絞り込み文字列
    • 絞り込み文字列はスクリプト変数
    • ファイル絞り込み用バッファを開くときに、空文字で初期化する
    • InsertCharPre で取得した文字列を絞り込み文字列に追加する
    • <BS> 押下で絞り込み文字列の末尾の文字を消す

file_selector をクラスとして考えると、下図のような感じ。

  • OpenFileSelector() を呼ぶたびに s:patterns:all_file_list を初期化する。
  • 文字入力されるたび( InsertCharPre が呼ばれるたび) AddChar()s:pattern 更新
    • InsertCharPre 内でバッファの更新ができないようなので、バッファの更新は TextChangedI で行う
  • <BS> が押されたら、 DelChar() -> UpdateBuffer() する。

上記のような方針で実装して、下記のような挙動が実現できた。

所感

「OpenFileSelector() を呼び出したバッファでファイルを開きたい」とか、 すでに気に入らないところがあるが、とりあえず絞り込み UI の習作として使用・改良していきたい。

リポジトリはこちら。

以上。

2016/11/28

vim-themis, vital-power-assert を使って vim plugin の単体テストを書いてみた

vim-themis, vital-power-assert を使って単体テストのコードを書いたので、ここに作業を記録する。

手順概要

  1. 必要なパッケージを導入
  2. .themisrc を作成する
  3. テストコードを書く
  4. テストを実行する

以下、各手順を説明していく。

1. vim-themis 導入

vim 標準のパッケージマネージャを使っているので、下記構成で git submodule add した。

.vim
└── pack
     └── test
         └── opt
             ├── vim-themis
             ├── vital.vim
             ├── vital-power-assert
             ├── vital-safe-string
             └── vital-vimlcompiler

注意点 :

  • vital-power-assert は、 vital.vim, vital-vimlcompiler, vital-safe-string に依存しているので忘れず導入する
  • テスト時しか使用しないので、 opt に入れる

2. .themisrc を作成する

vital-power-assert の README, '.themisrc' を参照しつつ .themisrc を作成。

packadd! vital.vim
packadd! vital-vimlcompiler
packadd! vital-safe-string
packadd! vital-power-assert
"
let g:__vital_power_assert_config = {
\   '__debug__': 1,
\   '__pseudo_throw__': 0
\ }

注意点 :

  • 必要なパッケージを packadd! で追加
  • themis へのランタイムパス追加は必要なかった。(packadd! で追加されるのかな?)

3. テストコードを書く

テストコードは、プラグインディレクトリ直下に test ディレクトリを作ってその中に書いていく。

vital-power-assert の README, 'test/Example.vimspec' をマネして Vimspeck-style で記述した。

Describe Test for buffer_selector
  Before all
    let V = vital#of('vital')
    let PowerAssert = V.import('Vim.PowerAssert')
    let s:assert = PowerAssert.assert
  End

  It test_GetBufNo
    let buffers_buffer =  '  1  h   "[無名]"                       行 0'
        \ . "\n" . '  9  h   "[無名]"                       行 0'
        \ . "\n" . ' 10  h   "[無名]"                       行 0'
        \ . "\n" . '119 %a   "[無名]"                       行 1'

    put!=buffers_buffer

    call cursor(1, 1)
    let bufno = buffer_selector#GetBufNo()
    execute s:assert('bufno is# "1"')

    call cursor(2, 1)
    let bufno = buffer_selector#GetBufNo()
    execute s:assert('bufno is# "9"')

    call cursor(3, 1)
    let bufno = buffer_selector#GetBufNo()
    execute s:assert('bufno is# "10"')

    call cursor(4, 1)
    let bufno = buffer_selector#GetBufNo()
    execute s:assert('bufno is# "119"')
  End
End

4. テストを実行する

ターミナルでプラグインのルートディレクトリに移動して、themis を実行すると、 vimspec ファイルを探して実行してくれる。

 ~/.vim/pack/test/opt/vim-themis/bin/themis --reporter spec
Test for buffer_selector
  [✓] test_GetBufNo

tests 1
passes 1

fail の場合は下記のようになる。

~/.vim/pack/test/opt/vim-themis/bin/themis --reporter spec
Test for buffer_selector
  [✖] test_GetBufNo
      function 89() abort dict  Line:22  ()

      vital: PowerAssert:
      bufno is# "120"
      |     |
      '119' 0

tests 1
passes 0
fails 1

実際にやってみたプロジェクトはこちら

buffer_selector.vim - Added test code.

「どうすればテストしやすいか」と、「どうやってテストするか」はまだまだ勉強が必要だ...。

以上。

2016/11/21

シンプルバッファーセレクタープラグイン buffer_selector.vim を作成した

シンプルバッファーセレクタープラグイン buffer_selector.vim を作成した。

mikoto2000/buffer_selector.vim: シンプルで簡単に使えるバッファーセレクター

目的と経緯

目的のバッファーへの切り替えをもっと簡単に行いたい。

今までは、:buffers してバッファー番号を確認した後 :buffer number でバッファを切り替えていた。 これが意外とつらい。

  1. :Unite buffer みたいに選びたいけど、Unite ヘビーなので入れたくない
  2. bufferlist.vim を試したけど、縦分割が気に入らない
  3. 勉強がてら作ってみようか

という感じ。

これ書きながら思ったのが、バッファーセレクターじゃなくて、 ファイルセレクターあたりも視野に入れてプラグイン探したほうが良かった気がする。

手順概要

大体こんな流れで実装していった。

  1. とりあえず書く
  2. 関数化して、それっぽい場所に移動
  3. help ドキュメントを書く
  4. plugin として切り出す

以下、各手順について説明していく。

1. とりあえず書く

適当なファイルにスクリプトを書いて、都度都度 source % で実行していった。

最初は、こんな感じのスクリプトを書いてバッファ一覧がとれるか確認した。

""" 変数 buffer_list に ``ls`` の結果を格納
let buffer_list=""
redir => buffer_list
silent ls
redir END

""" 新しいバッファを作成
new __BUFFERLIST__

""" __BUFFERLIST__ に ``ls`` の結果を表示
put!=buffer_list

その後、インクリメンタルに source % しながら実装していき、最終的にできたのがこれ。

""" 変数 buffer_list に ``:ls`` の結果を格納
let buffer_list=""
redir => buffer_list
silent ls
redir END

""" 新しいバッファを作成
if bufexists(bufnr('__BUFFERLIST__'))
    bwipeout! __BUFFERLIST__
endif
silent bo new __BUFFERLIST__

""" __BUFFERLIST__ に ``:ls`` の結果を表示
silent put!=buffer_list

""" 先頭と末尾が空行になるのでそれを削除
normal G"_dd
normal gg"_dd

""" ウィンドウサイズ調整
let current_win_height=winheight('%')
let line_num=line('$')
if current_win_height - line_num > 0
    execute "normal z" . line_num . "\<Return>"
endif

""" バッファリスト用バッファの設定
setlocal noshowcmd
setlocal noswapfile
setlocal buftype=nofile
setlocal bufhidden=delete
setlocal nobuflisted
setlocal nomodifiable
setlocal nowrap
setlocal nonumber

""" 選択したバッファに移動
map <buffer> <Return> ^viwy:bwipeout!<Return>:buffer <C-r>"<Return>
map <buffer> q :bwipeout!<Return>

2. 関数化して、それっぽい場所に移動

「1.」の段階で、 source % すれば所望の動きになることが確認できているので、 あとは

  1. 関数化して autoload に突っ込む
  2. .vimrc で関数を呼び出すマッピングを定義する

をすれば OK。

具体的に、どこにどう配置したかは、 コミット見るのが早そうなのでリンク張る。

Added simple buffer select process

3. help ドキュメントを書く

はじめてプラグインを作ってみた。それとhelpの書き方など - 反省はしても後悔はしない を参考に、 jax ファイルを作成。

これもコミットへのリンクのほうがわかりやすいか。

Added document of 'buffer_selector'.

4. plugin として切り出す

新しいリポジトリを作って作成したファイルを追加。

mikoto2000/buffer_selector.vim: シンプルで簡単に使えるバッファーセレクター

その後、もともと作っていたソースを削除し、代わりに、新しく作ったリポジトリをパッケージに登録。

Carve out 'buffer_selector.vim' to external plugin.

プラグイン作成作業は以上。

所感

だらだら作っていったけど、 プラグイン管理の仕組みを使ってすぐインストールできる vim プラグインが作れたからとりあえず満足した。

以上。

2016/10/28

[作業記録][Debian] Debian 8.5 最小構成インストールから Redmine3 + redmine_code_review を使えるようになるまで

環境

  • Debian 8.5 最小構成インストール
  • sudo, vim, ssh はインストール済み

目標

Debian 8.5 で、Redmine を使いたい、そしてコードレビューもしたい。

そのため、下記組み合わせで Redmine を使用できるようにする。

  • Redmine 3.3.1
  • redmine_code_review
  • sqlite3
  • Unicorn
  • nginx

Redmine と Nginx, Unicorn の連携については、このあたり の投稿を参考にすれば問題ないはずなので省略。

作業概要

  1. Redmine の準備
    1. 必要パッケージのインストール
    2. Redmine ソースコードの取得
    3. データベース設定
    4. 必要な gem のインストール
    5. デフォルトデータ作成
    6. secret token の準備
    7. 動作確認
  2. redmine_code_review の準備
    1. redmine_code_review ソースコードの取得と配置
    2. データベースのマイグレーション
    3. 動作確認

以下、各作業の詳細を記述していく。

Redmie の準備

必要パッケージのインストール

Redmine インストールにあたり、いろいろ必要なので apt でインストールする。

# ベースの最新化
sudo apt update
sudo apt upgrade

# rails のためのパッケージ
sudo apt install ruby-rails

# redmine の gem インストール時に必要になるものたち
sudo apt install zlib1g-dev pkg-config libmagickcore-dev libmagickwand-dev libsqlite3-dev

# Redmine を svn で取得してこれるように
sudo apt install subversion

Redmine ソースコードの取得

svn の stable ブランチからソースを取得する。今回は、 3.3-stable を取得する。

今回は、Redmine のルートディレクトリは /var/redmine とする。

sudo mkdir /var/redmine
sudo svn co https://svn.redmine.org/redmine/branches/3.3-stable /var/redmine
sudo chown -R www-data:www-data /var/redmine

データベース設定

今回は、 /var/redmine/db/redmine.sqlite3 を Redmine 用のデータベースとする。

1. ひな形コピー

cd /var/redmine
sudo -u www-data cp config/database.yml.example config/database.yml
sudo -u www-data vim config/database.yml

2. 設定ファイル編集

/var/redmine/db/redmine.sqlite3 を編集する。

# SQLite3 configuration example
production:
  adapter: sqlite3
  database: db/redmine.sqlite3

必要な gem のインストール

gem をインストール

cd /var/redmine
sudo -u www-data bundle install --path vendor/bundle

デフォルトデータ作成

cd /var/redmine
sudo -u www-data bundle exec rake db:migrate RAILS_ENV=production
sudo -u www-data bundle exec rake redmine:load_default_data RAILS_ENV=production

secret token の準備

セッション関係で使うトークンを生成するらしい。

cd /var/redmine
sudo -u www-data bundle exec rake generate_session_store

動作確認

cd /var/redmine
sudo -u www-data bundle exec rails server webrick -b 0.0.0.0 -e production

redmine_code_review の準備

redmine_code_review ソースコードの取得と配置

cd ~
wget https://bitbucket.org/haru_iida/redmine_code_review/downloads/redmine_code_review-0.7.0.zip
unzip redmine_code_review-0.7.0.zip
sudo -u www-data cp -r redmine_code_review /var/redmine/plugins

データベースのマイグレーション

cd /var/redmine
sudo -u www-data bundle exec rake redmine:plugins:migrate RAILS_ENV=production

動作確認

cd /var/redmine
sudo -u www-data bundle exec rails server webrick -b 0.0.0.0 -e production

2016/10/26 時点では、「コードレビュー」タブをクリックすると Internal Error になってしまう。 そのため、プロジェクトの設定で「コードレビュータブを隠す」にチェックを入れてタブを隠す。

以上。

2016/10/20

[作業記録] Windows で、Sphinx のスタンドアロンインストーラを試してみる

目標

Windows で Sphinx を使えるようにする。

環境

  • Windows Insider Build 14936
  • msys2 インストール済み
    • なので、コマンドプロンプトでも python 叩くと python 3.4.3 が起動する状態

作業概要

  1. インストーラーのダウンロード
  2. インストール

以下、各作業についての詳細を記述。

インストーラーのダウンロード

下記ページからインストーラーをダウンロードする。

Windowsへのインストール(スタンドアロンインストール) — Python製ドキュメンテーションビルダー、Sphinxの日本ユーザ会 : http://sphinx-users.jp/gettingstarted/install_windows_standalone.html

今回は、SphinxInstaller-1.4.1.20160416-py2.7-win32.zip をダウンロードした。

インストール

展開して出てきた SphinxInstaller-1.4.1.20160416-py2.7-win32.exe を管理者として実行する。

基本、デフォルトで OK, 好みがあれば適宜変更すればよい感じ。

動作確認

msys2 環境で実行。

mikoto@mnhomewin  ~
$ mkdir -p project/sphinx-test

mikoto@mnhomewin  ~
$ cd project/sphinx-test/

mikoto@mnhomewin  ~/project/sphinx-test
$ sphinx-quickstart

Welcome to the Sphinx 1.4.1 quickstart utility.

Please enter values for the following settings (just press Enter to
accept a default value, if one is given in brackets).

Enter the root path for documentation.
> Root path for the documentation [.]:

You have two options for placing the build directory for Sphinx output.
Either, you use a directory "_build" within the root path, or you separate
"source" and "build" directories within the root path.
> Separate source and build directories (y/n) [n]: y

Inside the root directory, two more directories will be created; "_templates"
for custom HTML templates and "_static" for custom stylesheets and other static
files. You can enter another prefix (such as ".") to replace the underscore.
> Name prefix for templates and static dir [_]:

The project name will occur in several places in the built documentation.
> Project name: Test
> Author name(s): Mikoto2000

Sphinx has the notion of a "version" and a "release" for the
software. Each version can have multiple releases. For example, for
Python the version is something like 2.5 or 3.0, while the release is
something like 2.5.1 or 3.0a1.  If you don't need this dual structure,
just set both to the same value.
> Project version: 1.0.0
> Project release [1.0.0]:

If the documents are to be written in a language other than English,
you can select a language here by its language code. Sphinx will then
translate text that it generates into that language.

For a list of supported codes, see
http://sphinx-doc.org/config.html#confval-language.
> Project language [en]: ja

The file name suffix for source files. Commonly, this is either ".txt"
or ".rst".  Only files with this suffix are considered documents.
> Source file suffix [.rst]:

One document is special in that it is considered the top node of the
"contents tree", that is, it is the root of the hierarchical structure
of the documents. Normally, this is "index", but if your "index"
document is a custom template, you can also set this to another filename.
> Name of your master document (without suffix) [index]:

Sphinx can also add configuration for epub output:
> Do you want to use the epub builder (y/n) [n]:

Please indicate if you want to use one of the following Sphinx extensions:
> autodoc: automatically insert docstrings from modules (y/n) [n]:
> doctest: automatically test code snippets in doctest blocks (y/n) [n]:
> intersphinx: link between Sphinx documentation of different projects (y/n) [n]:
> todo: write "todo" entries that can be shown or hidden on build (y/n) [n]:
> coverage: checks for documentation coverage (y/n) [n]:
> imgmath: include math, rendered as PNG or SVG images (y/n) [n]:
> mathjax: include math, rendered in the browser by MathJax (y/n) [n]:
> ifconfig: conditional inclusion of content based on config values (y/n) [n]:
> viewcode: include links to the source code of documented Python objects (y/n) [n]:
> githubpages: create .nojekyll file to publish the document on GitHub pages (y/n) [n]:

A Makefile and a Windows command file can be generated for you so that you
only have to run e.g. `make html' instead of invoking sphinx-build
directly.
> Create Makefile? (y/n) [y]:
> Create Windows command file? (y/n) [y]:

Creating file .\source\conf.py.
Creating file .\source\index.rst.
Creating file .\Makefile.
Creating file .\make.bat.

Finished: An initial directory structure has been created.

You should now populate your master file .\source\index.rst and create other documentation
source files. Use the Makefile to build the docs, like so:
   make builder
where "builder" is one of the supported builders, e.g. html, latex or linkcheck.

mikoto@mnhomewin  ~/project/sphinx-test
$ make html
sphinx-build -b html -d build/doctrees   source build/html
Running Sphinx v1.4.1
making output directory...
loading translations [ja]... done
loading pickled environment... not yet created
building [mo]: targets for 0 po files that are out of date
building [html]: targets for 1 source files that are out of date
updating environment: 1 added, 0 changed, 0 removed
reading sources... [100%] index
looking for now-outdated files... none found
pickling environment... done
checking consistency... done
preparing documents... done
writing output... [100%] index
generating indices... genindex
writing additional pages... search
copying static files... done
copying extra files... done
dumping search index in Japanese (code: ja) ... done
dumping object inventory... done
build succeeded.

Build finished. The HTML pages are in build/html.

mikoto@mnhomewin  ~/project/sphinx-test
$ start build/html/index.html

これで、 sphinx のウェルカムページが見えるはず。 ...msys2 環境でやるなら pacman で入れたほうが良くなかったか?

動作確認 on コマンドプロンプト

ということでコマンドプロンプトで試す。

C:\Users\mikoto>mkdir -p project\sphinx-test

C:\Users\mikoto>cd project\sphinx-test

C:\Users\mikoto\project\sphinx-test>sphinx-quickstart
Welcome to the Sphinx 1.4.1 quickstart utility.

Please enter values for the following settings (just press Enter to
accept a default value, if one is given in brackets).

Enter the root path for documentation.
> Root path for the documentation [.]:

You have two options for placing the build directory for Sphinx output.
Either, you use a directory "_build" within the root path, or you separate
"source" and "build" directories within the root path.
> Separate source and build directories (y/n) [n]: y

Inside the root directory, two more directories will be created; "_templates"
for custom HTML templates and "_static" for custom stylesheets and other static
files. You can enter another prefix (such as ".") to replace the underscore.
> Name prefix for templates and static dir [_]:

The project name will occur in several places in the built documentation.
> Project name: Test2
> Author name(s): Mikoto2000

Sphinx has the notion of a "version" and a "release" for the
software. Each version can have multiple releases. For example, for
Python the version is something like 2.5 or 3.0, while the release is
something like 2.5.1 or 3.0a1.  If you don't need this dual structure,
just set both to the same value.
> Project version: 1.0.0
> Project release [1.0.0]:

If the documents are to be written in a language other than English,
you can select a language here by its language code. Sphinx will then
translate text that it generates into that language.

For a list of supported codes, see
http://sphinx-doc.org/config.html#confval-language.
> Project language [en]: ja

The file name suffix for source files. Commonly, this is either ".txt"
or ".rst".  Only files with this suffix are considered documents.
> Source file suffix [.rst]:

One document is special in that it is considered the top node of the
"contents tree", that is, it is the root of the hierarchical structure
of the documents. Normally, this is "index", but if your "index"
document is a custom template, you can also set this to another filename.
> Name of your master document (without suffix) [index]:

Sphinx can also add configuration for epub output:
> Do you want to use the epub builder (y/n) [n]:

Please indicate if you want to use one of the following Sphinx extensions:
> autodoc: automatically insert docstrings from modules (y/n) [n]:
> doctest: automatically test code snippets in doctest blocks (y/n) [n]:
> intersphinx: link between Sphinx documentation of different projects (y/n) [n]:
> todo: write "todo" entries that can be shown or hidden on build (y/n) [n]:
> coverage: checks for documentation coverage (y/n) [n]:
> imgmath: include math, rendered as PNG or SVG images (y/n) [n]:
> mathjax: include math, rendered in the browser by MathJax (y/n) [n]:
> ifconfig: conditional inclusion of content based on config values (y/n) [n]:
> viewcode: include links to the source code of documented Python objects (y/n) [n]:
> githubpages: create .nojekyll file to publish the document on GitHub pages (y/n) [n]:

A Makefile and a Windows command file can be generated for you so that you
only have to run e.g. `make html' instead of invoking sphinx-build
directly.
> Create Makefile? (y/n) [y]:
> Create Windows command file? (y/n) [y]:

Creating file .\source\conf.py.
Creating file .\source\index.rst.
Creating file .\Makefile.
Creating file .\make.bat.

Finished: An initial directory structure has been created.

You should now populate your master file .\source\index.rst and create other documentation
source files. Use the Makefile to build the docs, like so:
   make builder
where "builder" is one of the supported builders, e.g. html, latex or linkcheck.

C:\Users\mikoto\project\sphinx-test>make.bat html
Running Sphinx v1.4.1
making output directory...
loading translations [ja]... done
loading pickled environment... not yet created
building [mo]: targets for 0 po files that are out of date
building [html]: targets for 1 source files that are out of date
updating environment: 1 added, 0 changed, 0 removed
reading sources... [100%] index
looking for now-outdated files... none found
pickling environment... done
checking consistency... done
preparing documents... done
writing output... [100%] index
generating indices... genindex
writing additional pages... search
copying static files... done
copying extra files... done
dumping search index in Japanese (code: ja) ... done
dumping object inventory... done
build succeeded.

Build finished. The HTML pages are in build/html.

C:\Users\mikoto\project\sphinx-test>start build\html\index.html

うん、OK です。

msys2 環境が悪さしないで良かった。

2016/10/19

[作業記録][Debian] Sphinx を使ってみたい

環境

  • Debian 8.5 最小構成インストール
  • sudo, vim, ssh はインストール済み

目標

Sphinx でドキュメントを作成し、生成した html を Nginx で公開する。

作業

下記手順で作業を行う。

  1. 必要パッケージのインストール
  2. sphinx プロジェクトの作成
  3. ドキュメント作成
  4. ドキュメントビルド
  5. html を配置

必要パッケージのインストール

make が必要なの注意。

sudo apt install python3-sphinx
sudo apt install nginx
sudo apt install make

sphinx プロジェクトの作成

Separate source and build directoriesy のほうが管理しやすい感じがした。 その他はよしなにする感じで。

mikoto@debian-base:~$ mkdir -p sphinx/test
mikoto@debian-base:~$ cd sphinx/test/
mikoto@debian-base:~/sphinx/test$ sphinx-quickstart
Welcome to the Sphinx 1.2.3 quickstart utility.

Please enter values for the following settings (just press Enter to
accept a default value, if one is given in brackets).

Enter the root path for documentation.
> Root path for the documentation [.]:     

You have two options for placing the build directory for Sphinx output.
Either, you use a directory "_build" within the root path, or you separate
"source" and "build" directories within the root path.
> Separate source and build directories (y/n) [n]: y

Inside the root directory, two more directories will be created; "_templates"
for custom HTML templates and "_static" for custom stylesheets and other static
files. You can enter another prefix (such as ".") to replace the underscore.
> Name prefix for templates and static dir [_]: 

The project name will occur in several places in the built documentation.
> Project name: Test
> Author name(s): Mikoto2000

Sphinx has the notion of a "version" and a "release" for the
software. Each version can have multiple releases. For example, for
Python the version is something like 2.5 or 3.0, while the release is
something like 2.5.1 or 3.0a1.  If you don't need this dual structure,
just set both to the same value.
> Project version: 1.0.0
> Project release [1.0.0]: 

The file name suffix for source files. Commonly, this is either ".txt"
or ".rst".  Only files with this suffix are considered documents.
> Source file suffix [.rst]: 

One document is special in that it is considered the top node of the
"contents tree", that is, it is the root of the hierarchical structure
of the documents. Normally, this is "index", but if your "index"
document is a custom template, you can also set this to another filename.
> Name of your master document (without suffix) [index]: 

Sphinx can also add configuration for epub output:
> Do you want to use the epub builder (y/n) [n]: 

Please indicate if you want to use one of the following Sphinx extensions:
> autodoc: automatically insert docstrings from modules (y/n) [n]: 
> doctest: automatically test code snippets in doctest blocks (y/n) [n]: 
> intersphinx: link between Sphinx documentation of different projects (y/n) [n]: 
> todo: write "todo" entries that can be shown or hidden on build (y/n) [n]: 
> coverage: checks for documentation coverage (y/n) [n]: 
> pngmath: include math, rendered as PNG images (y/n) [n]: 
> mathjax: include math, rendered in the browser by MathJax (y/n) [n]: 
> ifconfig: conditional inclusion of content based on config values (y/n) [n]: 
> viewcode: include links to the source code of documented Python objects (y/n) [n]: 

A Makefile and a Windows command file can be generated for you so that you
only have to run e.g. `make html' instead of invoking sphinx-build
directly.
> Create Makefile? (y/n) [y]: 
> Create Windows command file? (y/n) [y]: n

Creating file ./source/conf.py.
Creating file ./source/index.rst.
Creating file ./Makefile.

Finished: An initial directory structure has been created.

You should now populate your master file ./source/index.rst and create other documentation
source files. Use the Makefile to build the docs, like so:
   make builder
where "builder" is one of the supported builders, e.g. html, latex or linkcheck.

こんな感じのディレクトリ構成になります。

mikoto@debian-base:~/sphinx/test$ find ./ -maxdepth 2 
./
./build
./Makefile
./source
./source/conf.py
./source/index.rst
./source/_templates
./source/_static

ドキュメント作成

適当にドキュメントを作ります。

今回は、test.rst を作成して、 index.rsttoctreetest.rst を追加。

mikoto@debian-base:~/sphinx/test$ cat source/test.rst 
====
test
====

Hello Sphinx document!

mikoto@debian-base:~/sphinx/test$ cat source/index.rst 
.. Test documentation master file, created by
   sphinx-quickstart on Tue Oct 18 23:52:34 2016.
   You can adapt this file completely to your liking, but it should at least
   contain the root `toctree` directive.

Welcome to Test's documentation!
================================

Contents:

.. toctree::
   :maxdepth: 2

   test


Indices and tables
==================


* :ref:`genindex`
* :ref:`modindex`
* :ref:`search`

ドキュメントビルド

プロジェクトルートで make html するだけ。

mikoto@debian-base:~/sphinx/test$ make html
sphinx-build -b html -d build/doctrees   source build/html
Making output directory...
Running Sphinx v1.2.3
loading pickled environment... failed: [Errno 2] No such file or directory: '/home/mikoto/sphinx/test/build/doctrees/environment.pickle'
building [html]: targets for 2 source files that are out of date
updating environment: 2 added, 0 changed, 0 removed
reading sources... [100%] test                                                                                       looking for now-outdated files... none found
pickling environment... done
checking consistency... done
preparing documents... done
writing output... [100%] test                                                                                        writing additional files... genindex search
copying static files... done
copying extra files... done
dumping search index... done
dumping object inventory... done
build succeeded.

build/html に html ファイルが生成される。

html を配置

生成された heml ファイルをそのまま nginx のドキュメントルートに突っ込んでしまえば OK。

mikoto@debian-base:~/sphinx/test$ sudo cp -r build/html/* /var/www/html/

これで、 http://ホスト名/ にアクセスすると、生成した Sphinx ドキュメントが参照できるようになっているはず。

以上。